In the competitive U.S. housing market, the visual appeal of a listing is the single most critical factor in driving click-through rates. Real Estate Photo Enhancement is the process of using software or AI algorithms to optimize property images by balancing lighting (HDR), correcting colors, sharpening details, and rectifying vertical perspective distortions. This tool is designed for real estate agents, property managers, and listing coordinators who need to transform standard smartphone or DSLR photos into professional, MLS-ready marketing assets instantly and without the cost of high-end photography retainers.
Buyer’s Checklist for Photo Enhancement Tools
Before selecting a photo enhancement solution in 2026, U.S. agents should evaluate tools based on the following criteria to ensure they meet the fast-paced demands of the market:
Turnaround Speed: Can the tool process images instantly (seconds), or does it require a 12–24 hour wait for human editors?
Dynamic Range (HDR) Capability: Does the tool effectively balance bright windows with dark interiors so both views are visible?
Perspective Correction: Can it automatically straighten vertical lines (walls and door frames) to prevent the "leaning house" effect?
Sky Replacement: Does it include intelligent masking to replace gloomy, overcast skies with vibrant blue ones?
MLS Compliance: Does the enhancement stay within ethical boundaries (no removal of permanent fixtures like power lines)?
Cost Structure: Is it a free utility, a subscription model, or a pay-per-photo service?
Mobile Usability: Can the tool be accessed and used directly from a smartphone for on-the-go editing?
Ease of Use: Is the interface "one-click," or does it require advanced knowledge of histograms and curves?
Listing Agents: Needing to quickly upload "Coming Soon" photos or update a listing where the original photographer missed a shot.
Rental Agents: managing high-volume portfolios where hiring a pro photographer for every unit isn't ROI-positive.
Social Media Managers: Creating snappy, high-contrast visuals for Instagram or Facebook stories.
Capture or Select Image: Choose a photo that has good composition but poor lighting (e.g., a dark living room or a dull exterior).
Upload: Navigate to the tool and upload your image file.
Process: Allow the AI to analyze the histogram and apply corrections to exposure, contrast, and saturation automatically.
Review: Check the "Before and After" slider to ensure the window views are clearer and the room looks brighter.
Download: Save the high-resolution enhanced image to your device.
Publish: Upload directly to your MLS, Zillow, or social media platforms.
Manual Professional Software:
Description: Comprehensive desktop software (like Adobe Lightroom) used by professional photographers.
Pros: Ultimate control over every pixel; batch processing capabilities.
Cons: Steep learning curve; requires a monthly subscription; time-consuming for non-experts.
Outsourced Human Editors:
Description: Sending raw files to overseas editing teams via a platform.
Pros: Human attention to detail; can handle complex requests like removing cars from driveways.
Cons: 12 to 24-hour turnaround time; costs range from $1.00 to $5.00 per photo; communication delays.
In-App Filters:
Description: Built-in filters on smartphones or social media apps.
Pros: Instant and free.
Cons: Generic filters often oversaturate colors and degrade image quality, making listings look unprofessional or "fake."
Shoot at Eye Level: Avoid holding the camera too high or too low. Shooting at chest height (approx. 5ft) usually produces the most natural room perspective.
Use Natural Light: Open all curtains and blinds before shooting. Even the best enhancer works better with natural light sources.
Hold Steady: Ensure the camera is stable to avoid motion blur. Enhancement software can fix lighting, but it cannot fix a blurry, out-of-focus photo.
Oversaturation: Pushing the "vibrance" too high makes grass look neon green and wood floors look orange. This is a red flag for buyers.
Distorted Verticals: Failing to straighten vertical lines makes walls look like they are falling over. Always ensure vertical lines are parallel to the side of the frame.
Over-processing Shadows: Brightening shadows too much can introduce "noise" (grain) into the photo, reducing clarity.
Do not use photo editing to alter the physical structure of the home or hide material defects (e.g., erasing cracks in the foundation or changing the color of permanent siding).
Do not alter the neighborhood demographics or remove permanent landmarks (power lines, water towers, neighboring buildings) as this misrepresents the property's setting.
Digital enhancements should only be used to correct temporary issues (like a gray sky) or represent how the human eye perceives the space (balancing light).

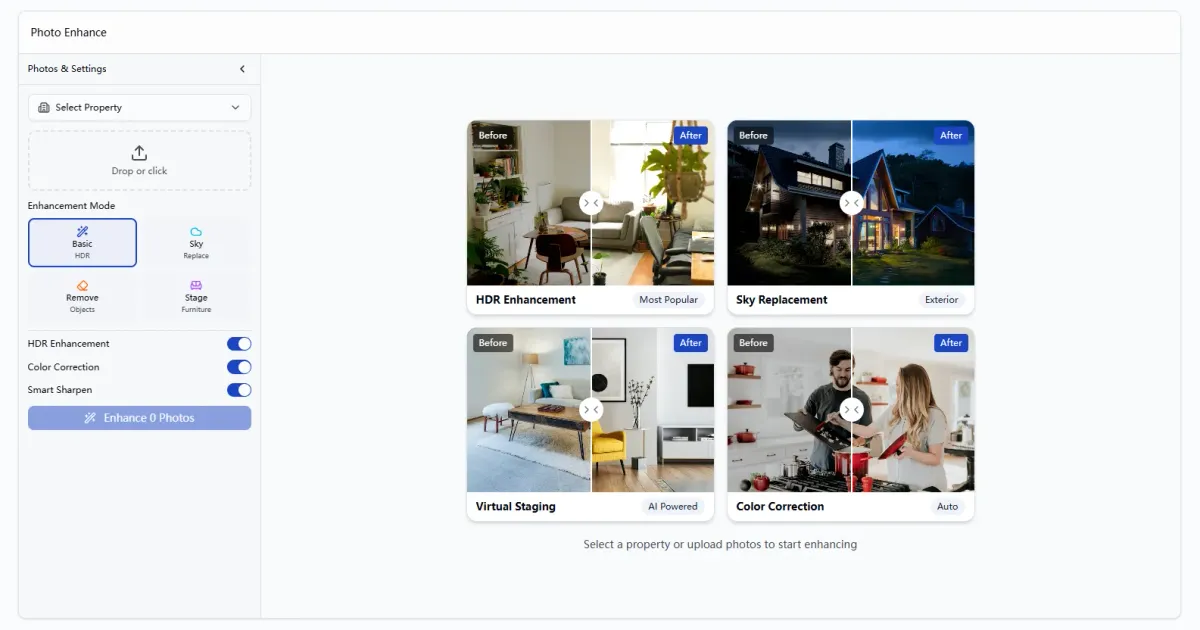
Why EstatePass Photo Enhance?
EstatePass Photo Enhance is a specialized AI-driven tool built to streamline the post-production workflow for real estate professionals. Unlike generic photo editors, its algorithms are trained specifically on architectural and interior photography data.
What it does:
It analyzes the image to identify under-exposed shadows (dark corners) and over-exposed highlights (blown-out windows). It then intelligently re-maps the tones to simulate high-dynamic-range (HDR) photography, sharpens structural details, and boosts color vibrancy without making the image look "cartoonish."
Inputs required:
The tool accepts standard image formats (JPEG, PNG) taken from smartphones (iPhone/Android) or digital cameras. It works best with photos that are in focus but suffer from poor lighting or dull colors.
Who fits best:
How to Use It: A Quick Walkthrough
Using AI-powered enhancement tools is significantly faster than manual editing. Here is the typical workflow:
Ready to improve your listing photos instantly? Try EstatePass Photo Enhance now.

Alternatives to AI Photo Enhancement
While AI tools offer speed and convenience, agents should be aware of the broader landscape of photo editing options:
Best Practices & Common Mistakes
Best Practices:
Common Mistakes:

Frequently Asked Questions (FAQ)
1. What is the difference between standard editing and HDR?
Standard editing adjusts a single image. HDR (High Dynamic Range) blends multiple exposures (dark, medium, light) to ensure you can see details in both the dark corners of a room and the bright view out the window. AI enhancers simulate this effect from a single photo.
2. Is photo enhancement allowed on the MLS?
Yes, as long as it represents the property accurately. You can fix lighting and color, but you cannot change permanent physical features (like removing a fire hydrant or repairing a hole in the wall digitally) without disclosure.
3. Can this tool fix blurry photos?
Generally, no. Photo enhancement focuses on lighting, color, and contrast. If the original image is out of focus (blurry), software cannot magically recreate the missing detail.
4. How much time does AI enhancement save?
Manual editing can take 10–15 minutes per photo. AI enhancement typically takes 5–10 seconds per photo.
5. Does enhancement work on exterior photos?
Yes. It is particularly effective for exteriors, often replacing gray skies with blue ones and brightening shadows on the front of the house.
6. Will the photos look fake?
If used correctly, no. The goal of modern 2026 AI tools is "photorealism." However, aggressive manual editing can lead to an artificial look.
7. Can I use smartphone photos?
Absolutely. Modern smartphones (iPhone 14/15/16, Pixel, Samsung) have excellent sensors. AI enhancement is the perfect finishing step to make phone photos look like DSLR shots.
8. What resolution do I need for MLS?
Most U.S. MLS systems recommend images around 3000 pixels wide. Ensure your source photo is high quality so the enhanced version remains sharp.
9. Is this different from Virtual Staging?
Yes. Photo enhancement improves the quality of the existing photo (lighting/color). Virtual staging adds digital furniture to an empty room.
10. Do I still need a professional photographer?
For high-end luxury listings, a professional photographer is recommended. For leases, land, or mid-range quick listings, AI enhancement is often a sufficient and cost-effective alternative.
Compliance Note & Disclaimer
Compliance Note:
Real estate agents must adhere to the Truth in Advertising laws and the Fair Housing Act.
Disclaimer:
This guide is for informational purposes only and does not constitute legal, financial, or professional photography advice. Tools and features mentioned are subject to change. Always verify your local MLS rules and state real estate commission guidelines regarding digital image manipulation before publishing listings.
Ready to transform your listing photos?
Use the free tool today: EstatePass Photo Enhance